2824 阅读 2020-02-17 15:35:48 上传
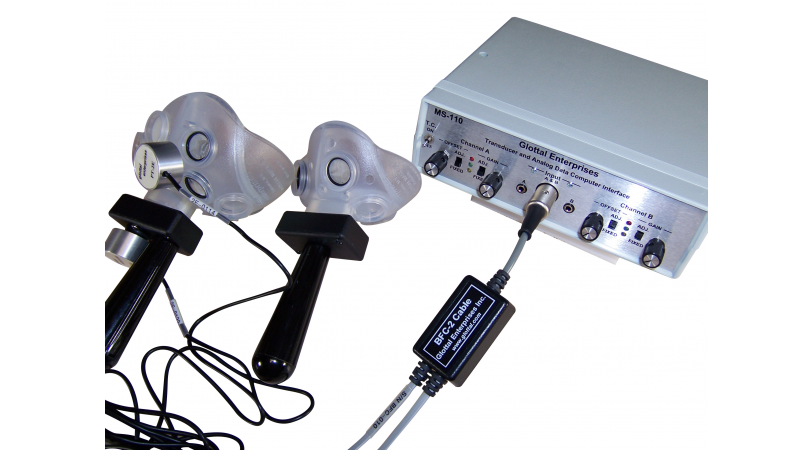
When you unpack your equipment,You should take out your pressure calibrates your MS-100.This is your airflow Calibrated with the syringe.Here's your Mask .Handle in your mask,And then you need your OPA.And the OPA tube that goes on the inside.And then you plug,Here's your BFC cable,You plug the PT2E into the A.And you plug the PT25 five into the B,And that gets plugged into the front of your MS-110.And your MS-110 USB cable goes from the back of the MS-110In to the USB port of your computer.And then you want to have the offsets on the adjustable.And we're getting the MS-110 ready to do calibrating and the gains on fixed.And then also,If you're not going to use the power cord for the MS-110You want to have it on USB power,And then the modulators are both on and Input invert the switches are both off.Okay.So.Okay,First,We are going to calibrate the pressure calibrating the PT25,So you want to take the PT25 and put it into the transducer port of your calibratedand make sure that this hole here is closed.Now to bring the syringe upYou always want to pressure the pressure relief valve first.So you're not putting a negative pressure onto the transducer,transducer Which could damage it.So now we are ready to calibrate the PT25,So you want to open here of you on your computer,So you want to open here of you on your computer.And this is a screen you're going to get you want to press Calibrate.Calibrate and record pressure calibration signal.And this will clear if you have anything on your display will clear it.So click yesAnd this is what it will look like.You want to have your Mic in and around 25This can be adjusted if needed.You want to have demodulate,Pick demodulate channel B,And you want the red to fill in the space between these two first lines.So this looks about right.If this needs adjusting,You would use your offset button to adjust it bigger and smaller.So now we have it at about the right place.So now and we have the syringe up.So now I will click Set Zero.And then after I clicks set zero,I'm going to put 10cmH2OSend centimeters of pressure onto the calibrated.Now.I'm going to press record.And then I'm going to press the pressure releaseAnd then I'm going to press the pressure relief that.Relief switch and hold it.And you will get this wave form,Which looks great.And then,If you want to see it,You can change the pressure range here,So to make a little more visible,That's too much.OK,That looks good.So now we're going to click to the left.And we're going to click to the right.So you want to click on the two flat spaces?And then we are going to choose calibration and calibrate pressure and you're going to see that this line will then line up with 10cm of pressure.So you want to pick 10cmAnd now it's calibrated set at 10.OK,So now we've calibrated the pressure calibrated,And I just want to remind you that always have the pressure release button pressed when you're pulling up on the syringe.OK,So now we're going to bring over the airflow calibrated that has the PT2E plugged into the pressure for it.This is the transducer port.We plugged that in Nice and firmly,And we are going to bring the syringe up to a hundred and forty milliliters.Okay,So we get that set now we're going to go back to the screen and pressed calibration.Record airflow calibration set nowSo here again you have your signal and you wanted to modulate Channel A.So now I'm get to press Set ZeroAnd then.I am get to press record and once I pressed record,I am only going to have a second to press this.The syringe down so I'm going to press sets you are again.And record,And then down nice and firm.And that's the signal that you should get.So we can expand that a little bit if you want by Bringing the gain up.There we go,So that looks great.You want to click to the left right when it starts up and to the right right of the right?When it comes down.Now You want to press calibration,Calibrate airflow so you get a calibrate airflow.And then you're going to be do you wish to press Yes,And then it's one for cause the a hundred and forty milliliters.and the calibration factor are for the calibration factor relates to how many screen rings you have in your mask right now we're using four screen rings.So we pick a calibration factor or four if you're using the fifth screen ring than you would pick five.But we shipped the mask with this not being used so you're going to pick four as your calibration factor.So we're going to put the mask aside for now.But these calibration factor for us because of the four screen rings.So now we go back to our program and we press calibration.Okay,Now you are PT2E is fully calibrated.So now we're going to.Go up to file,We're going up fast,Record a new pressure flow signal and press Yes,And now we take our mask.And the PT25.It's going to go here in your OPA adapter,Which is in the hole that your mask comes with a hole there.And your PT2E is going to go into the handle.Just like that.So that's what it should be looking like And you want to have the discs in the top.So that there's no screen rings in the top,So it's sealed.So you don't have air flow through there.So nowWe can leave.It adjusted the way it is.Okay,I'm going to now.Record a pressure and flow signal.So I pressed file.Let me close this,So I've pressed file record new pressure flow signal.And now I want to make sure my demodulation is correct,I pressed Set zero.I make sure when you press the zero that your mask is right up to your face,So you pressed Set zero.And then I'm going to record.Okay,So now that we have a nice looking waveform and we can bring them.The flow gain up a little bit.And that's probably good.Let's let's expand it.That's too much.Okay,Now it's easier to work with.And we can bring the pressure up, there we go.Whose pressure pulses so now we are going to calculate Makes some calculations.So we want to click to the left and to the right of a flow signal.You know.Press calculate,And there we have our calculations for that one.And then we can click to the left and to the right.Calculate and can do one more.Calculate.So there you can compare different different parts of your signal,And you can scan back and forth this way.It's good to see that it starts at zero.And it starts at zero.And you can export if you want to print.You could just press,Print and printed to a PDF or printed annual printer,And at this way,File is automatically saved.And this is where it's safe to users documents view data,And that's the name of this particular recording.I wanted to add that when measuring using the PT25 and measuring the pressure that this is the tube that we supply you and it's very important that it's your tongue when you're vocalizing is not blocking the tube,So it should go in the corner of the mouth and out of the way of the tongue.If you need to and cut this shorter.But you may have to do some experimenting until you get a good pressure pulse.


