
2026 阅读 2020-03-13 19:02:59 上传
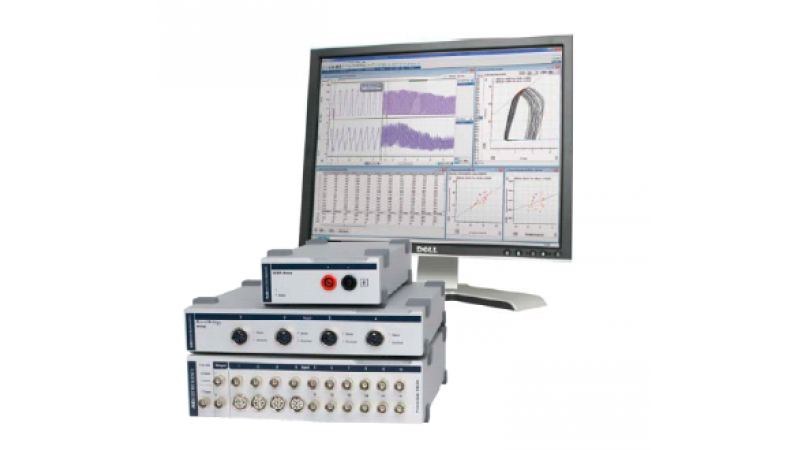
Hello, today we're gonna go over an introduction of the AD instruments PowerLab system.This is a basic experiment around and introduce you to the kind of the capabilities, that we have with this system as far as being able to hook up a subject and do a physiological experiment.So today's experiment is pretty simple one of my fingers to what we call a pulse transducer.And from that we're actually going to see a representation of my pulse pressure on the screen, this also correlate with what my heart rate is.So we'll be able to calculate average heart rate and I'll go over that basic calculation at the end of the setup here.So what I'm gonna do is open this box up,it locks closed,The equipment is fairly expensive So we do want to be careful with it.And we also want to make sure that we're putting back the wires in a nice coiled manner.As you can tell down Here are two of my required wires are nicely coiled,We have a power cable,and then we also have a USB cable,This of course will enable us to power the box,And then this will enable us to communicate with the computer.So I'm also going to grab this power lab box.And This is what we're going to hook up any of the wires that we're gonna use for any experiment too.so we'll always need these three things.now,up on the Top here,we have a bunch of different wires,And these wires not all of them are used during any experiment.Sometimes we use a combination of them and they're often hard to find.this little guide will help you to locate whatever you might need for that week's lab ,if your protocol calls for a pulse transducer,you can look and see that the pulse transducer should be in this area.And For today. I do need that pulse transducer.It's right up over here.So the person you used this last time coiled that great that's gonna keep us from having this equipment breaking it's also going to be great forthe next people who come into lab uh to use this and find what they need so do treat them withsome courtesy and make sure you put these things back nicely together.Well We're not using this box Let's close it up,make sure that nothing is sticking out of it.Andi'll keep it nice and safe,And For today. I can actually just move this out of the way here.Ok, so now I have everything I need for the experiment.And I'm going to show you how I hook this up,So a couple of different things we're going to do we're going to use this USB cable,And On the front of our computer We have a USB port,This should work for you Most of the time,There are alternate USB ports on the back of the computer.If for some reason we don't see the box communicating with your computer that could be an easy fix for that.So I'm gonna plug this in and where I plug it in is right on the back there's a little USB icon,right there. And I'm going toplug this end right into their.Everything should fit nicely. Don't force it. If it doesn't,And Then I will plug the other end into my computer.Once i've done that, I have a power cable right here.And the power cable,again,is going to be plugged into the back area here,this is also by the power for the box.So when you're looking to turn on this box this is the switch that we'll use.There's also a switch on the front that says isolated stimulator, We rarely use that ,so it doesn't need to be turned on.this is the one we wanted for today.So I plug this in,And Here. In our lab, we have the tables outfitted with power strips.So you'll be able to plug into one of the power strips right there,And Now, at this point, we have power going to the box. and right now no lights are on the front. If I turn this power switch on,then I can see lights there.So now we have power going to the box And we also have a cable connecting this to the computer So we'll be in communication with the computer.Now the next thing I wanna do is uncoil this pulse transducer.Andmost of the time we're going to use input one,so I'm going to plug this into input one,and it should go in fairly easily.You'll have to use a little bit of pressure but don't force it.you want to get the holes to align correctly.If something looks like it's not gonna fit don't try to push it in there.so now we are going to just straighten out this cable.And It should be pretty easy to do,if the last person coiled it up. Soif you put it back nicely,it's usually going to be set up the same way for you.nowwhat i'll do is i'll actually connect this to my finger,what I'm going to do first is go over here . on the screen,So I'm gonna click this little windows icon,And In the windows icon. I get a little search menu here.Now in this search menu I'm just going to type in whatever I'm looking for,And in the protocol for this week the file is called pulse settings,So I'm going to type pulse setting zone.And Once I type that in I get a couple different options I'm just looking for the paul settings.So I click that,And Here. What I can see is I have a blank screen,But then I also have a green start icon.So the start icon is working ,That means that i've set everything up properly,And I'm in communication between the power lab box and the computer system.Let me just go back for a second and show you what would happen if I had not connected the box properly first. So I'm gonna close this down.And now i've turned off the box,So I'm going to type in tall settings again.And Now when I click on paul settings,it's gonna give me dialog box It just says something about legacy computer inputs Just click ok if you see something like that,What we're noticing here though is the start icon did not come on,So there's no green icon right thereThat means that we're not in communication between the computer.computer and the power lab box.So I will now,shut this down,turn it on correctly again and go right back to that pulse settings file.Ok, so now we can see the green icon is there, and we're ready to go.I just point that out because that's a very common error,It kind of persists for students throughout the semester throughout the year,So if you're not seeing that start icon, it means you likely didn't hook up the power cable,The USB cable are basically the computer and the power lab box are not in communication.So Right now We're looking good.We have these big monitors so you may as well just maximize your screen here,when I say maximize it's thisthis icon next to the red x and that gives us the whole screen to look at,what I'm going to do here is just,put this on my finger snugly.And When I say snugly,it's gonna be tight enough where it's not gonna readily pull off here.So now what I'm going to do is justclick down the start icon.And What I can see here,is that there's some kind of signal moving across the screen.I need to make a couple adjustments So the signal actually looks good to us and we can determine anything from it.I can tell that I have what looks to me like a really small indicator that I have a pulse going here,So what I'm going to do is make a couple changes that should make this easier to see,The first thing I'm going to do is expand the horizontal scaling,so what you'll notice is this is going to spread out what I'm looking at,andi've just spread it out once. I want to nowincrease the sensitivitySo I'm going to change the range here,And I'm gonna put it at 100 millvoltsmoving from two volts to 100 millvolts,moving from two volts to 100 millivolts,And Now I'm going to click Ok,OkayNow I can see that I have some spikes coming across the screen,It does look like it's corresponding with pulse that I'm feeling right now,And Now what I'm gonna do is, again, click on the horizontal scaling,and i've expanded that.Ok Now we have some good spikes We can actually tell something from this data.And Now I'm gonna make it just a little bit more sensitive.Now I can do two different things I can go into this pulse transducer areaor I can go over here and simply click on the positive ornegative icons. And those are going to enable me tomake this fit in the screen perfectlySo a nicequick easy fix there And that's going to work for us today.with that I'm going to just let this run as I'm being fairly quiet here,You would have your subject seated for this.And We would try to minimize any crossover of wires, any coiling of wires.These wires carry a current through them,And around those wires cause some problems for us.So if I'm just going to stand here for a secondI can see if my signal cleans up and I'm standing off to the side.So I can see that something else is going on causing some problems,what I'm going to do is I'm just going to move over to the other side here and get away from any power cables,make sure that nothing is coiled too much And as I'm moving around you can see what we call noise on the screen,We're Trying I'm trying to reduce this noise.OkCan see that it is cleaning up, but I'm gonna make some minor adjustments,I have some coiling here in the wire I'm going to check the tightness of this and make sure that I have it snug but not too snug,And see how we're doing. Again here.Ok So those changes made in a much cleaner signal,I do have to make just a brief adjustment,in my range. And if I click minus over here,okay, now it's perfect.So Don't get frustrated Just make sure that your hookup is good.Make sure that you're reducing any electromagnetic fields They can come from someone's laptop they can come from the monitor.Anything like that But now I have a nice thing signal that I can tell that this is my pulse, a measurement while we're making a measurement of the pressure change in my finger.And What we can do is we can actually calculate something like average heart rate from this.So I have a nice clean time period. I'm just going to click stop.And at that point, I don't need to have my subject connected anymore.And I'm going to now just look at the data here,And Whenever we're trying to do a calculationor make a measurement of any type of the power lab system,we want to use the marker.So that's going to give us an initial point And the marker is found down in here,If you can't find it in this area it's probably on the screen, If you click this area, the marker will appear,So there it is.And I'm going to drop it Just any place in between Two minutes 40 seconds to two minutes 45 seconds on there It's dropped,So this gives me an initial point um for an analogythe initial point would be the floor. Andthe final point would be the Top of your head,In this case,I've dropped the marker here and the markeris sitting between two minutes and 40 secondstwo minutes45 secondsI'm just going to move across the screenAnd what I can see here is that I get a Delta and a measurement in seconds,So this is a Delta timeAnd with this,I am going to goto 10.05 seconds, close enough for me.So I moved across the screen here,now what I'm going to do is actually look at the peaksin this area. Nowwhat I'm looking from is just the marker to wherever I put my cursor,That's my 10 second intervaltwo, three, four, five, six, seven,eight, nine, 10, 11.So that's a 10 second interval we're going to multiply that by six in order to figure outon average my heart rate would be. So six times 11 is 66.So right now my heart is beating about 66 beats a minute.So that's a simple measurement of just the change in pressure in my finger.what it gives us on the screen as a representation of what my heart rate is,And this is a nice easy introduction to power lab,because we only haveone wire hookup on the front and we go through the basic set up.So this is what you'll start with in lab this week,Do read the protocol before you come into the lab,It's gonna help you a lot to get this set up and working properly,Just make sure if you're having any challenges that you've hooked up the power cable,you've also hooked the AD instruments box to the computer,and that you're not having any type of interference from electrical device around the room.So that's your introduction,You'll enjoy this week's lab,and thank you very much for your attention.